Appearance
Availability
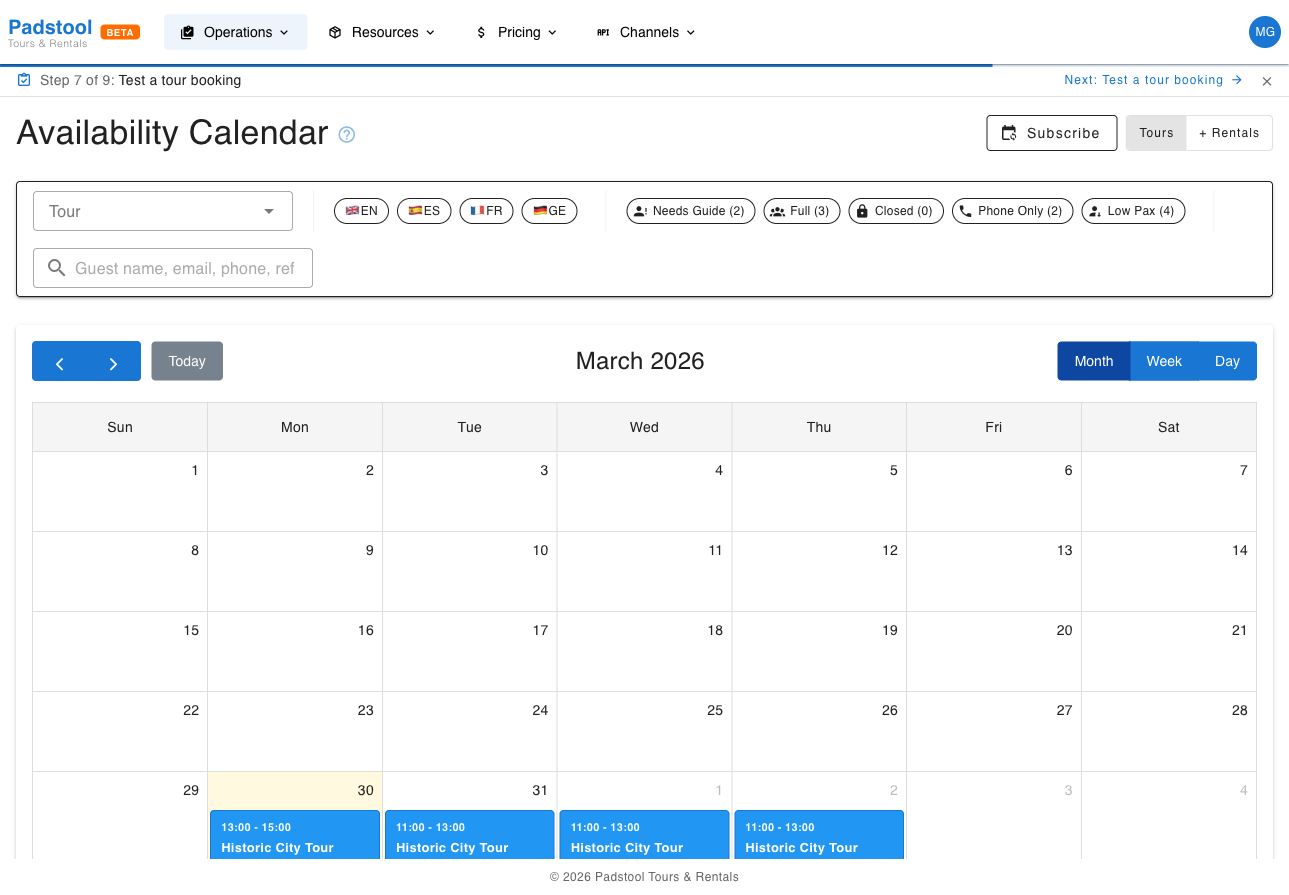
The Availability page is your central calendar for managing tour schedules. It shows all scheduled tours across your team, color-coded by tour type, and is where you create new schedules, assign guides, and monitor capacity.
Navigate to Operations > Availability to open the calendar.
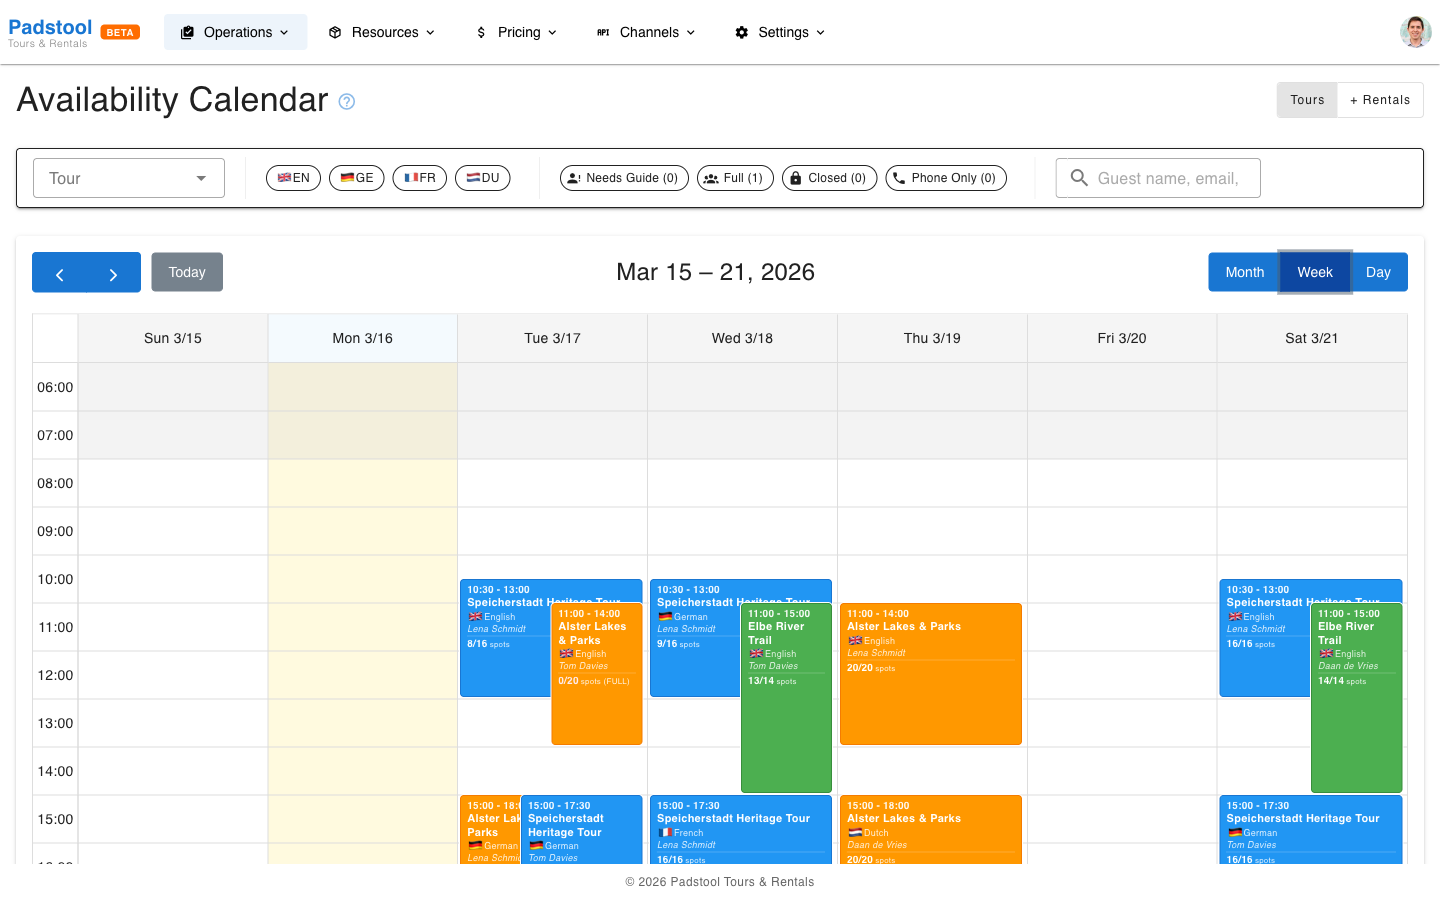
You can switch between day, week, and month views to get different perspectives on your upcoming schedule. The week view displays time slots for each day, making it easy to see tour distribution and guide workload across the week.
Creating schedules from the calendar
The fastest way to create a schedule is directly from the calendar. When you spot a gap in your schedule, click on it:
Month view - Click any day cell to open the schedule creation dialog with the date pre-filled. A subtle + icon appears on hover to indicate cells are clickable.
Week / Day view - Click any time slot to open the dialog with both the date and start time pre-filled. Slots highlight on hover to show they are clickable.
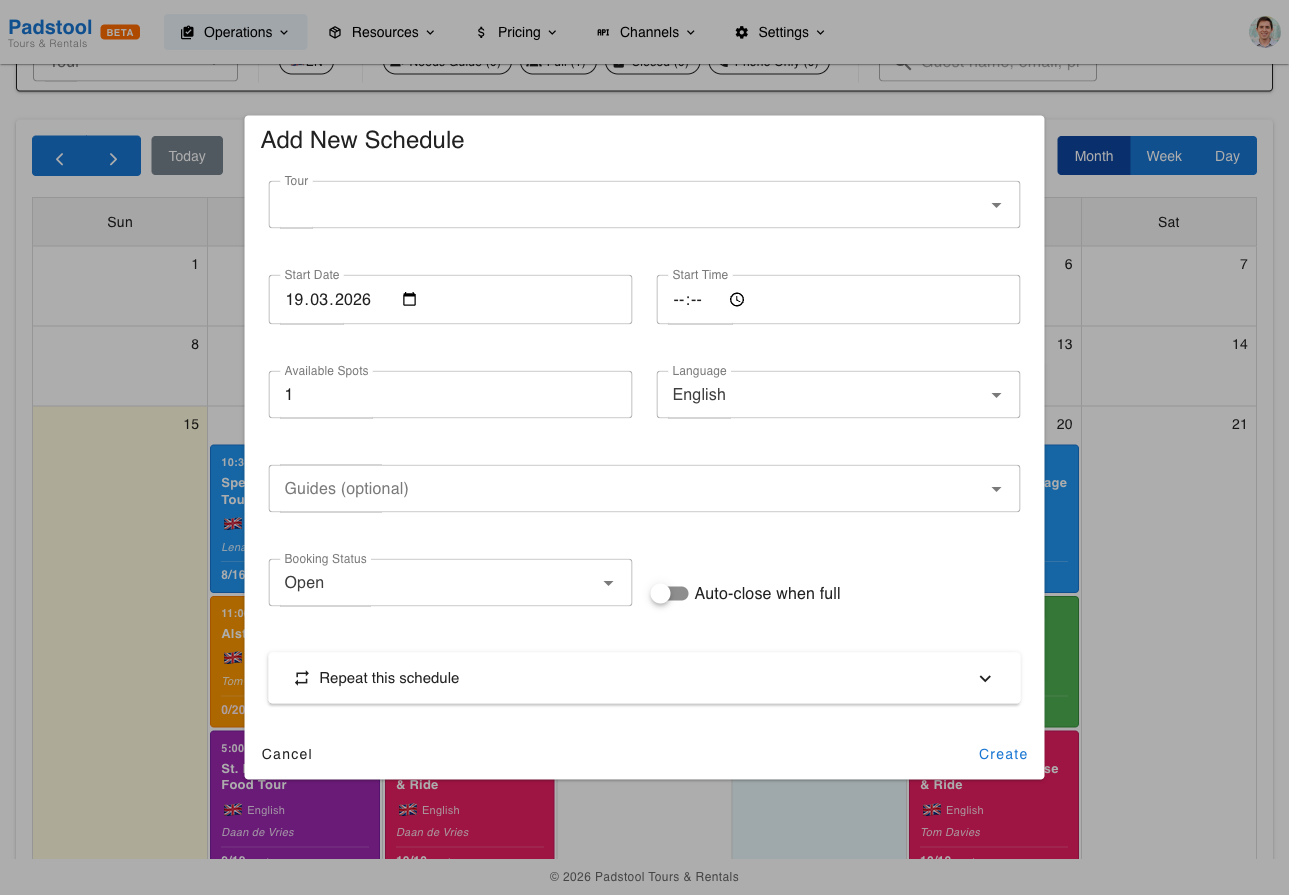
In the creation dialog:
- Select a tour - Choose which tour to schedule. If you have a tour filter active on the calendar, that tour is pre-selected automatically.
- Set the start time - The end time is calculated automatically from the tour's duration.
- Assign guides (optional) - The dropdown shows available guides and flags any conflicts.
- Set available spots - Defaults to the tour's max participants.
- Choose language and booking status.
- Click Create.
The new schedule appears on the calendar immediately.
Recurring schedules
To create the same schedule across multiple days, expand Repeat this schedule at the bottom of the creation dialog:
- Choose a pattern - Daily, Weekdays (Mon-Fri), Weekends (Sat-Sun), or Custom Days.
- Set the Repeat until date.
- Review the preview showing which dates will be created.
- Click Create X Schedules.
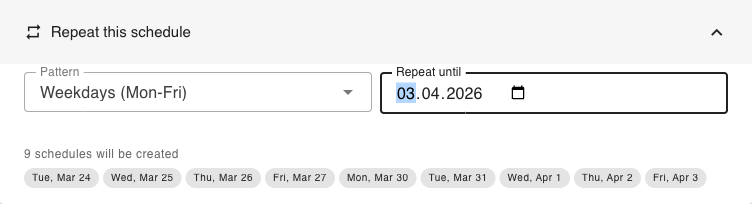
This is ideal when you're looking at the calendar and want to fill a recurring gap - for example, adding a weekday morning tour for the next two weeks.
TIP
Use the tour filter to narrow the calendar to one tour, then click a gap to create a schedule with that tour pre-selected. This is the fastest way to fill gaps for a specific tour.
Creating schedules from the tour page
You can also create schedules starting from the tour:
- Navigate to Resources > Tours and click the View Schedules action (calendar icon) on the tour row.
- Click Add Schedule to create a new schedule. Use the Repeat this schedule option in the creation dialog to generate recurring schedules across a date range.
See Tours - View Schedules for details on this flow.
Guide assignment
Guide assignment is optional when creating a schedule. There are two ways guides get assigned:
Automatic assignment
If a tour has auto-assign guides enabled (configured in the tour settings), guides are assigned and unassigned automatically as bookings come in. The system uses the participants per guide ratio to determine how many guides are needed and assigns available guides accordingly. This is the recommended approach for most tours - no manual intervention needed.
Manual assignment
You can also assign guides manually when creating or editing a schedule. The guide dropdown only shows guides who are actually available:
- Available guides are shown and can be selected.
- Unavailable guides are filtered out if they have a conflicting schedule or have marked themselves as unavailable for that date.
- Conflict detection is automatic - you cannot assign a guide to two overlapping tours.
Example: If Lena Schmidt is already scheduled for the Speicherstadt Heritage Tour from 9:30-12:00, she will not appear as available for an Alster Lakes tour starting at 10:00 the same day.
TIP
For most operators, enabling auto-assign on your tours is the easiest approach. Guides receive an email notification when assigned, and you can always override manually if needed.
Managing schedules
Click on any schedule in the calendar to open the Tour Schedule Details card. This card is your central hub for managing a specific departure.
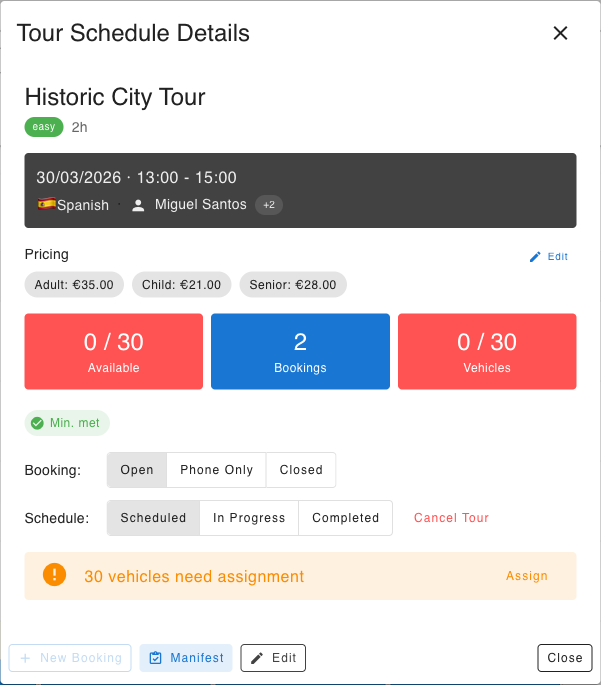
The detail card shows:
- Tour info - Name, difficulty, duration, and pricing per customer segment (e.g., Adult, Child, Senior) with any schedule-level overrides highlighted. An Edit button lets you set per-schedule pricing overrides.
- Schedule info - Date, time, language (with flag), and assigned guide(s).
- Stats - Three color-coded cards showing available spots, booking count, and vehicle assignment status. A red vehicles card means vehicles still need to be assigned.
- Booking status - Toggle between Open, Phone Only, and Closed to control how customers can book this departure.
- Schedule status - Move through the lifecycle: Scheduled, In Progress, Completed. A separate Cancel Tour button opens a confirmation dialog that cancels all bookings with full refunds and notifies customers and guides automatically.
- Vehicle alert - If vehicles are not yet assigned, a warning shows with a quick Assign button.
Actions at the bottom:
- New Booking - Create a manual booking for this specific schedule.
- Manifest - Open the day-of-tour check-in and guide assignment view.
- Edit - Update the schedule time, guides, spots, language, min. participants, or booking status. See Editing schedules for batch options.
- Delete - Remove the schedule. See Deleting schedules for batch options.
Editing schedules
Open a schedule and click Edit to change its time, guides, available spots, language, minimum participants, or booking status. If the schedule was created on its own, your edit only affects that single record - same as it has always been.
If the schedule was created as part of a recurring batch (using Repeat this schedule), the edit dialog shows an extra Apply changes to section so you can decide how far the change should fan out.
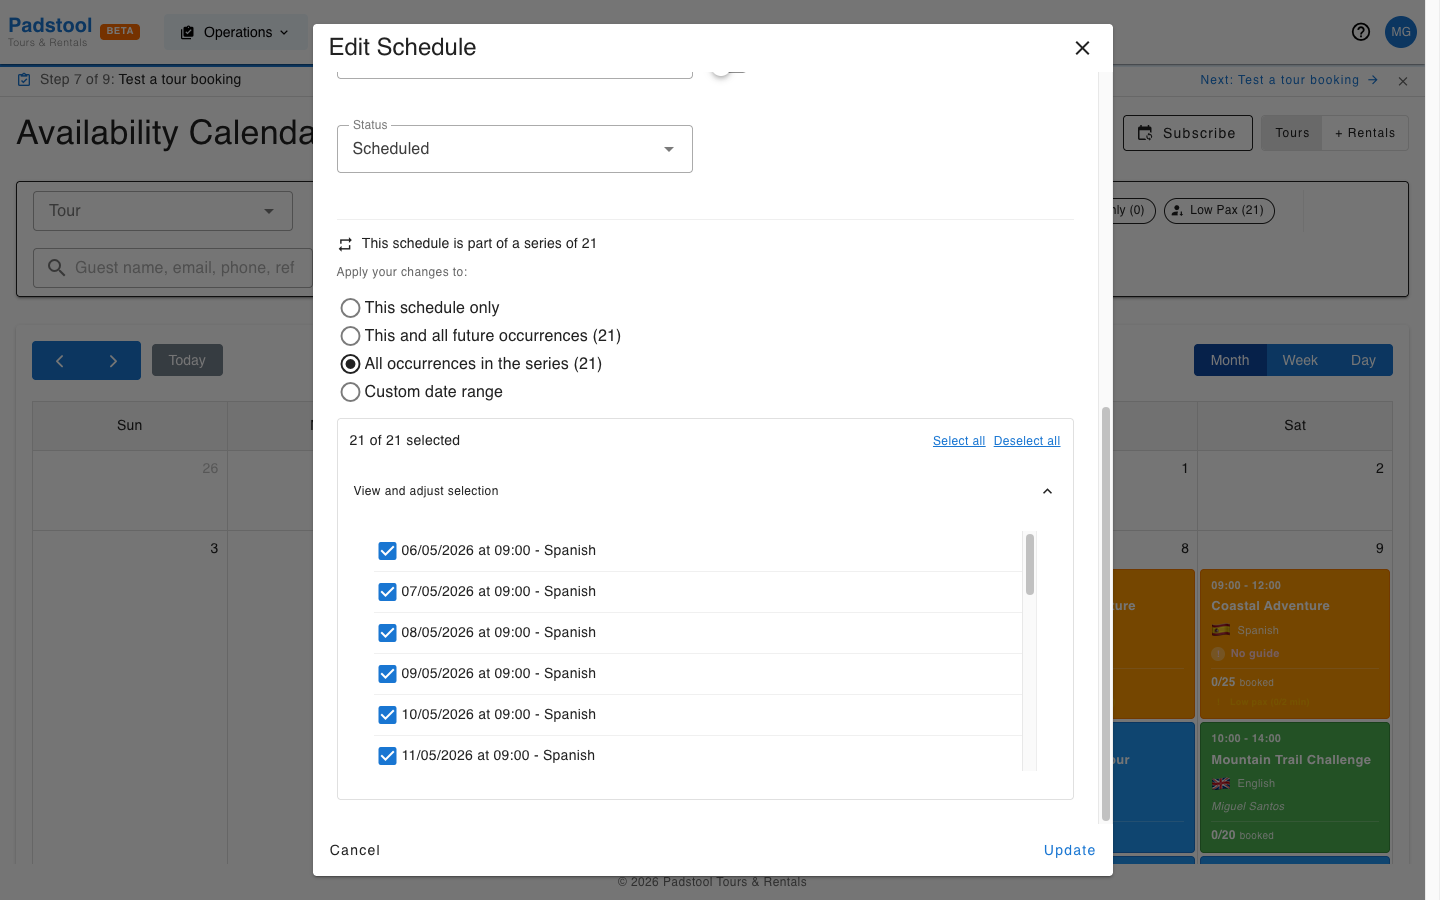
You get four scopes:
- This schedule only - Touches only the schedule you opened. Other dates in the series stay as they are.
- This and all future occurrences - Applies to this schedule and every later one in the same series. Best for "from next Monday onwards we start at 10:00 instead of 09:30".
- All occurrences in the series - Applies to every schedule in the series, past and future.
- Custom date range - Apply to schedules whose start date falls between two dates you pick. Useful for school holidays or one-off seasonal weeks.
When you choose any scope other than This schedule only, expand View and adjust selection to see the exact list of schedules the change will hit. Each row has a checkbox - uncheck any date you want to skip without changing the scope. The header shows "X of Y selected" and gives you quick Select all / Deselect all links.
Time changes are interpreted as a time-of-day shift relative to the schedule you opened. If you move a 09:30 schedule to 10:00 with scope All, every other schedule in the series moves by the same +30 minutes - they keep their original dates, only the time changes.
Per-schedule validation and skipped records
Each schedule in the selected set is validated independently before the change is saved. A schedule is skipped (not failed) when:
- The new time conflicts with another tour for the same guide.
- The new date lands on a day the tenant is closed (operating hours / closed dates).
- A capacity reduction would drop available spots below the schedules already booked.
Schedules that pass are updated; the rest are listed in a skipped summary at the end with the reason. One bad date in a 90-schedule batch never blocks the other 89.
Customer notifications
If the change moves the start or end time on schedules that already have bookings, customers receive an email about the new time automatically. The dialog shows a notice when bookings are affected and a toggle to opt out:
3 of these schedules already have bookings (12 customers affected). Customers will get an email about the time change unless you turn off the toggle below.
The toggle defaults to on. Turn it off only when you're communicating the change through another channel (e.g. a phone call to a corporate group).
Drag-and-drop rescheduling
You can reschedule a tour by dragging it on the Availability or Tour Schedules calendar. This is the fastest way to move a single schedule by an hour or two on the same day, or shift it to another day entirely.
- Drag the event header to a new day or time slot.
- Resize the bottom edge to change duration. Both edges snap to 30-minute steps so you can shift things by a half-hour rather than only by full hours.
- Schedules in the past are locked - you cannot drop on a date earlier than today.
- Cancelled, completed, or in-progress schedules are also locked.
Once you drop, a confirmation dialog opens summarising the move. If the schedule belongs to a series, the same scope selector from the edit dialog is available - so you can drag once and apply the move to This / Future / All / Range in one confirmation step. If the schedule has bookings, the customer-notification toggle appears here too.
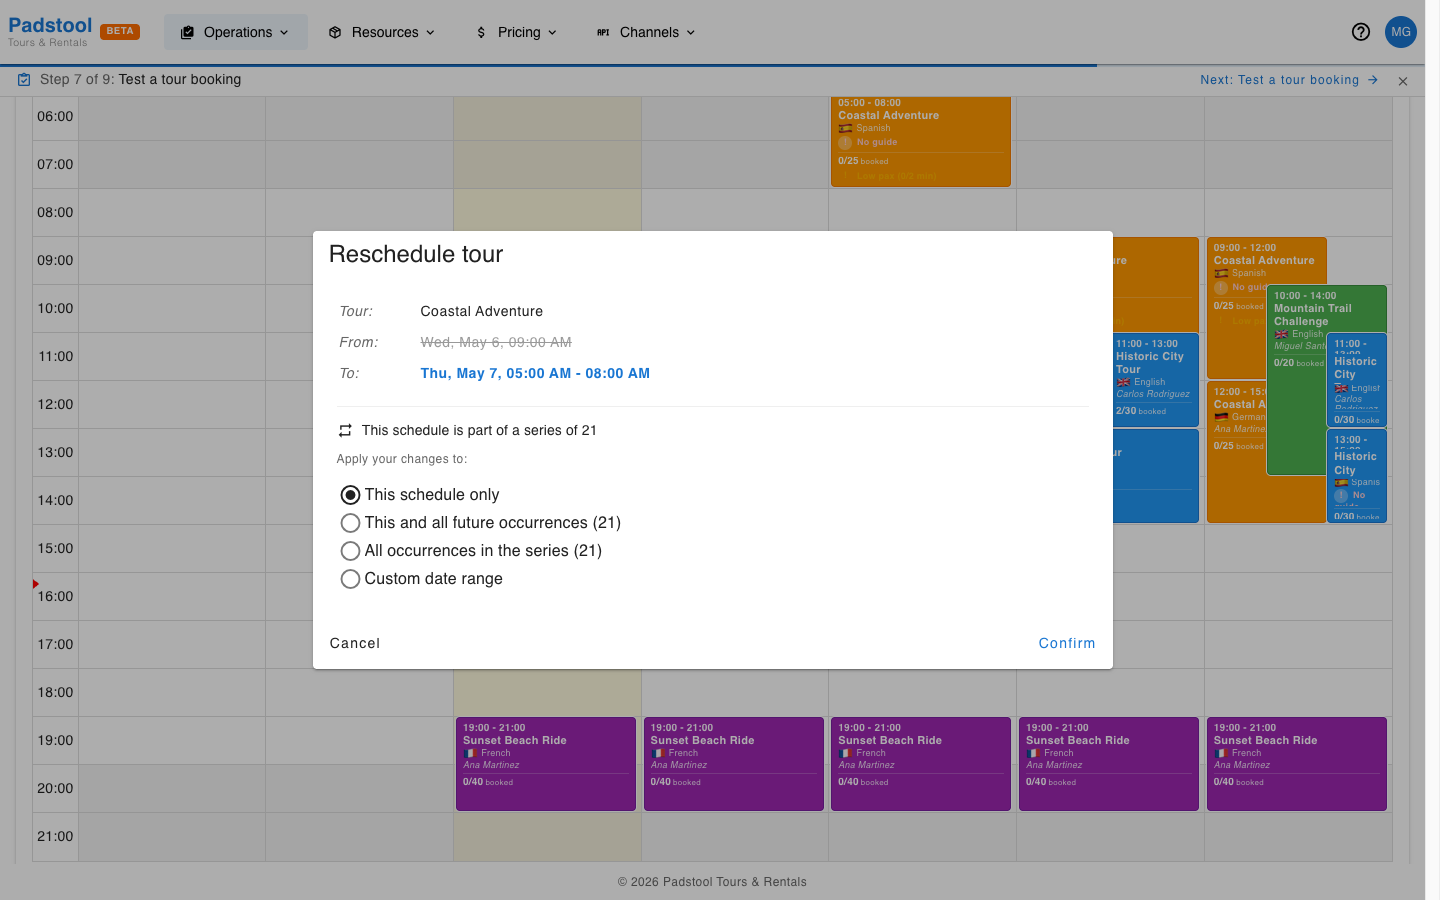
Click Cancel to roll the schedule back to its original time without saving.
Deleting schedules
Click Delete on a schedule to open the deletion dialog. Like the edit flow, the dialog adapts to whether the schedule is a one-off or part of a series.
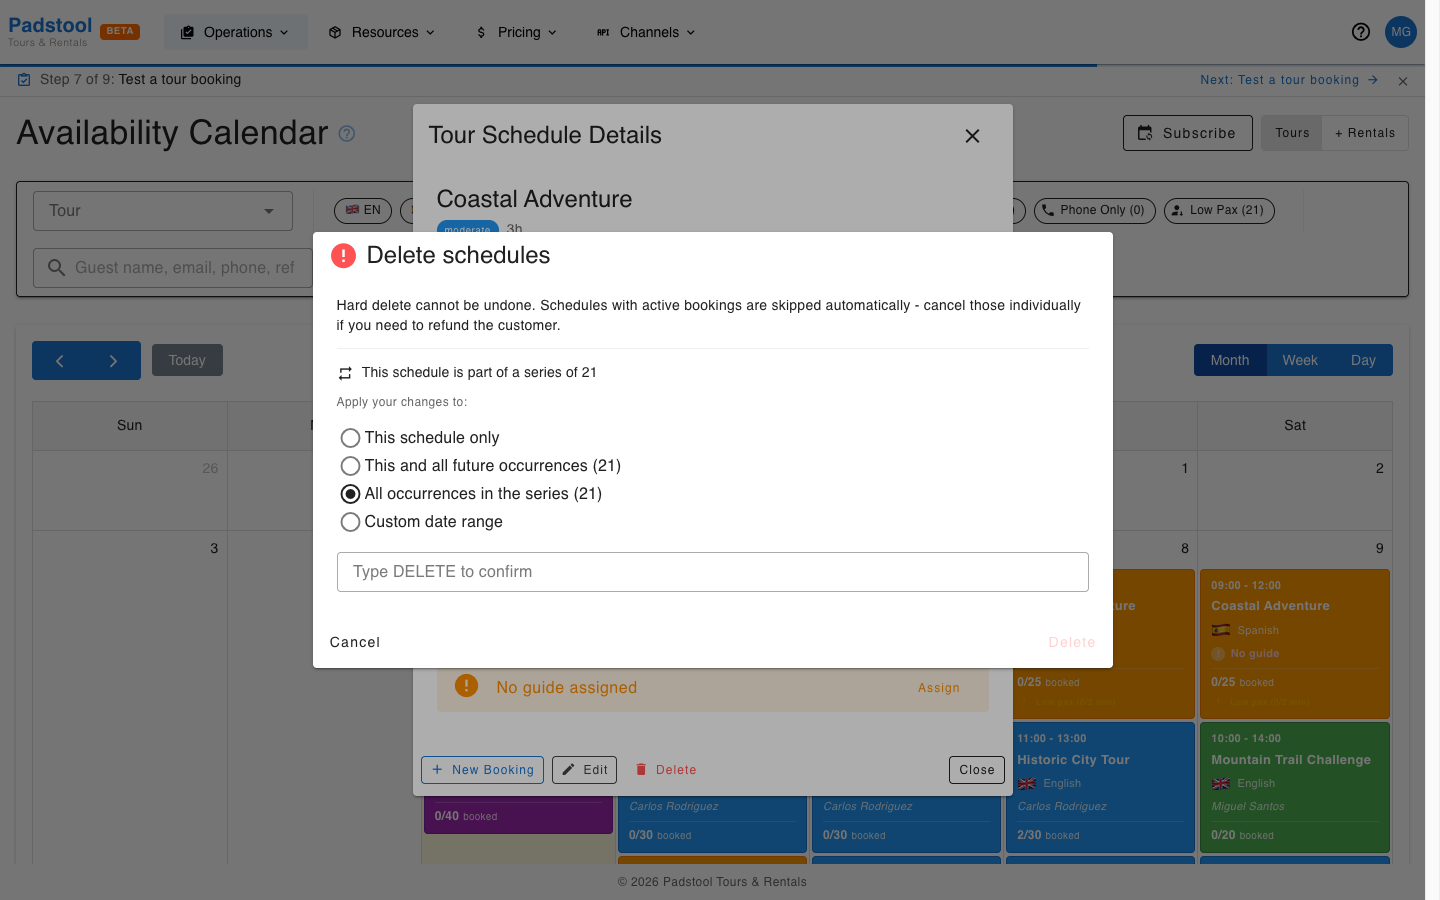
For a single schedule, the dialog shows a one-line summary and a confirmation field. For schedules in a series, the same scope selector (This / Future / All / Range) and per-row deselection are available - so you can wipe an accidentally bulk-created series in one action.
Skipped schedules
Hard delete cannot be undone. To prevent accidents, the service automatically skips any schedule it considers unsafe to remove:
- Schedules with active bookings - Always skipped. Cancel them individually first if you want to delete them - that triggers refunds and customer notifications. The deletion dialog shows a warning when any selected row has bookings.
- Completed schedules - Always skipped. They are kept for audit and reporting.
- Cancelled schedules - Skipped by default to protect against deleting tours that were cancelled deliberately weeks ago. When the selection contains cancelled rows, a checkbox appears: Also delete cancelled schedules. Tick it once you've reviewed the list.
After saving, you'll see how many schedules were deleted and how many were skipped (with the reason).
Type-to-confirm
Because batch deletion is irreversible, the dialog requires you to type DELETE (in capitals) before the Delete button enables. This is a small piece of friction designed to catch a misclick on a destructive action - take a second to confirm what's in the selection list before typing.
TIP
For typical day-to-day cleanup, use the cancel flow instead of delete. Cancel Tour keeps the schedule on the calendar (greyed out), refunds bookings, and notifies customers and guides. Delete is for the case when you bulk-created the wrong dates and want them gone entirely.
Vehicle assignment
The detail card shows a Vehicles stat (e.g., "0 / 8"). If vehicles are not yet assigned, a warning appears with a quick Assign button. Click it to allocate specific vehicles from your fleet to the tour:
- Select vehicles from your available inventory.
- Confirm the assignment.
Assigned vehicles are reserved for that tour and will not appear as available for other bookings during the same time window.
Manifest
The Manifest button on the detail card opens the day-of-tour operational hub for check-in and guide assignment. See the dedicated Manifests page for full details on the check-in workflow, guide assignment, and printing.
Availability calendar filters
The Availability page has a filter bar with several tools to help you find what you need:
- Attention flags - Chip buttons highlight schedules that need action: Needs Guide, Full, Closed, Phone Only, and Low Pax, each showing a count of matching schedules.
- Language filters - Language chips with flag icons let you show only schedules in specific languages.
- Guest search - A search field finds bookings by guest name, email, phone, or reference across all visible schedules. Results show how many bookings matched and which schedules contain them.
- Tour filter - A dropdown to show only schedules for a specific tour.
Understanding the calendar
The calendar uses visual cues to help you manage your schedule at a glance:
- Color coding - Each tour type has a distinct color for easy identification.
- Capacity indicators - Schedules show how many spots are filled vs available.
- Guide names - Assigned guides are displayed on each calendar entry. Multiple guides show as the first name with a +N indicator.
- Cancelled schedules - Cancelled tours appear greyed out with a strikethrough title, so you can see they existed without cluttering the active view.
Scheduling patterns
Most tour operators run the same tours in multiple languages throughout the day. Hamburg Bike Tours, for example, offers morning English departures and afternoon German departures of the same tour, with French and Dutch departures on select days.
Example weekly pattern:
| Tour | Time | Language | Guide |
|---|---|---|---|
| Speicherstadt Heritage Tour | 9:30 - 12:00 | English | Lena Schmidt |
| Speicherstadt Heritage Tour | 14:00 - 16:30 | German | Tom Davies |
| Alster Lakes & Parks | 10:00 - 13:00 | English | Tom Davies |
| Alster Lakes & Parks | 14:00 - 17:00 | German | Lena Schmidt |
| St. Pauli & Schanze Food Tour | 16:00 - 19:00 | English | Pieter van Hoek |
The language is set per schedule and is displayed with a flag icon on the calendar. Use the language filter chips to show only schedules in a specific language - useful for checking coverage across languages.
Tips
- Most operators schedule tours well in advance - often a full season or even the upcoming year. This gives customers plenty of booking lead time and helps with long-term planning.
- Monitor capacity on upcoming tours - near-full tours might warrant scheduling an additional departure.
- Use the calendar's week view to check guide workload distribution across the week. With auto-assign enabled, guides are staffed automatically as bookings come in.
- Keep a buffer between back-to-back tours for the same guide to allow for travel and preparation time.
- To cancel a scheduled tour, click it to open the detail card and click Cancel Tour. All active bookings are cancelled with full refunds, and customers and guides are notified automatically. If you want to reschedule some customers first, move their bookings individually before cancelling the schedule.
- To shift a series of schedules to a new time, open any schedule in the series, edit the time, and pick scope All or Future so the change fans out across the batch. See Editing schedules.
- To remove a series of schedules created by mistake (e.g. a bulk-create with the wrong language), open any schedule in the series, click Delete, and pick scope All. Bookings, completed, and cancelled schedules are skipped automatically - see Deleting schedules.
Vehicle assignment settings
Under Settings > Vehicle Assignment, you can configure how vehicles are assigned to bookings:
- Manual - Admins assign specific vehicles to each booking or tour participant.
- Auto - Vehicles are assigned automatically based on availability and the tour's default vehicle type.
- Hybrid - Combines automatic assignment with manual override capability.
There is also a Tour Auto-Assignment toggle that, when enabled, automatically assigns available vehicles to tour participants a configurable number of hours before the tour starts. The system checks each tour's default vehicle type and any participant-level add-on selections (e.g., E-Bike Upgrade) to determine which vehicle type each participant receives. See Default Vehicle Type for the full assignment priority.
TIP
The operating hours settings define when tours can be scheduled. Make sure your business hours cover your tour time slots, including evening tours.