Appearance
Tour Management
Tours are the products in your catalog - each tour defines a bookable experience with a description, duration, difficulty level, capacity, and pricing.
Viewing your tours
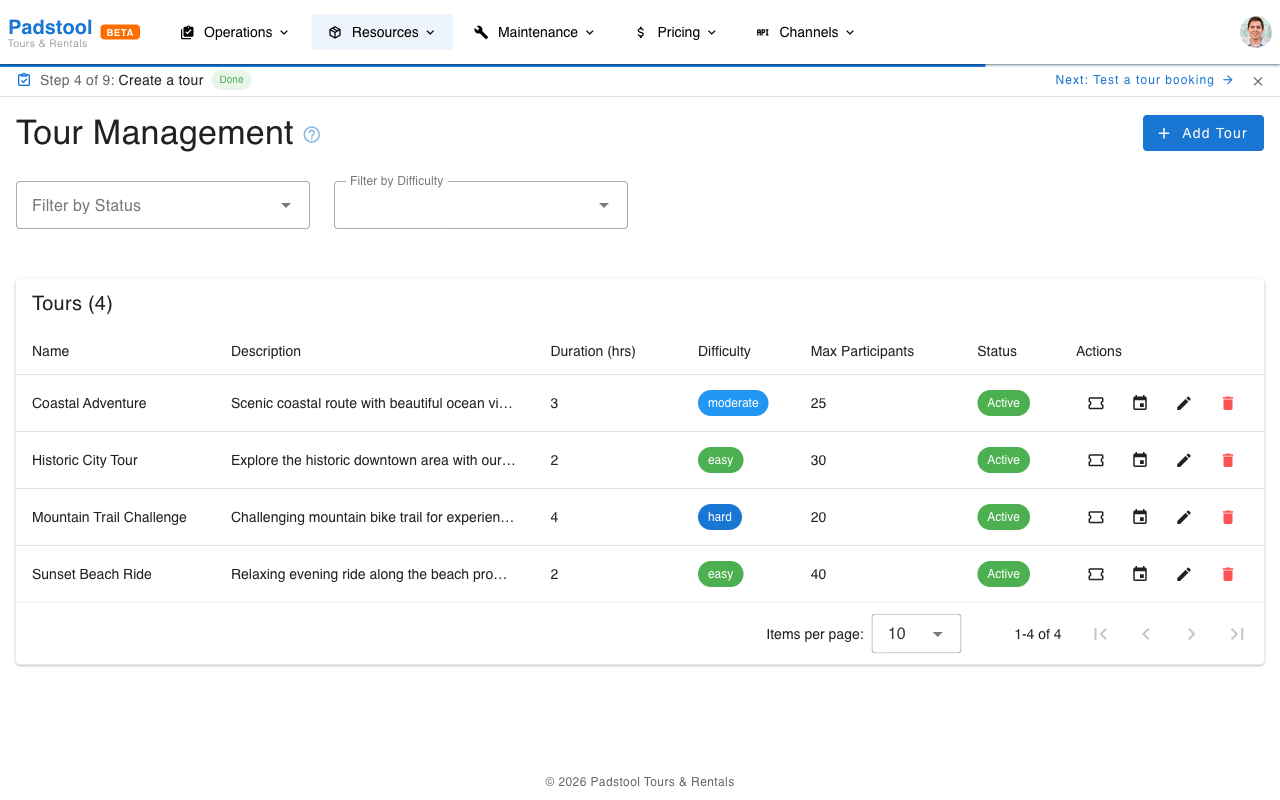
Navigate to Resources > Tours to see all your tours. The list shows each tour's name, duration, difficulty, capacity, and active status.
Use the filters to narrow the list:
- Filter by Status - Show only active or inactive tours.
- Filter by Difficulty - Show tours of a specific difficulty level.
How to create a tour
- Navigate to Resources > Tours.
- Click Add Tour.
- Fill in the tour details:
- Name - A descriptive title customers will see (e.g., "Speicherstadt Heritage Tour").
- Description - What the tour includes, highlights, and what to expect. Customers see this in the booking widget, so make it compelling.
- Duration - Tour length in minutes (e.g., 150 for a 2.5-hour tour). The hour conversion is shown next to the input field.
- Difficulty - Easy, moderate, or hard. Helps customers choose the right tour.
- Max participants - Maximum group size per scheduled instance. This controls availability - when a schedule reaches capacity, it appears as sold out in the booking widget.
- Active - Toggle off to keep the tour hidden from the booking widget while you finalize the setup.
- Click Save.
The tour creation dialog mirrors the sections described below. Each section can be configured during creation or edited later.
Pricing by price type
Below the basic information, configure prices for each price type you have created. This lets you set different prices per customer segment.
Example: Hamburg Bike Tours prices the Speicherstadt Heritage Tour at:
| Price Type | Price |
|---|---|
| Adult | €35.00 |
| Child | €21.00 |
| Senior | €28.00 |
You need to create price types before you can set tour pricing. The booking widget displays the primary price type's price (typically Adult) as the "from" price on tour cards.
Guide assignment
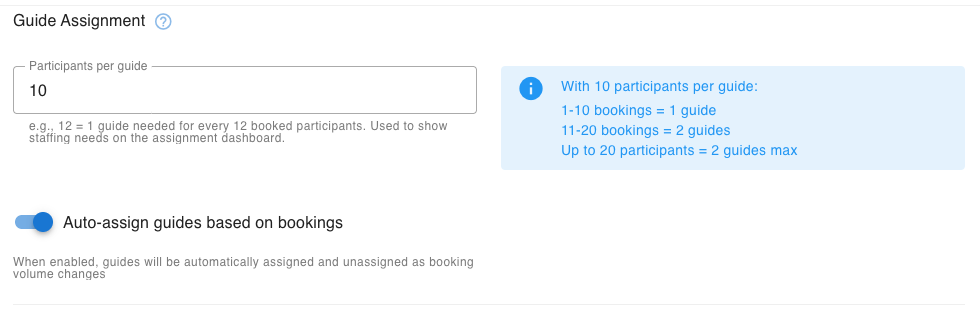
The Guide Assignment section controls how guides are staffed for departures of this tour.
- Participants per guide - The ratio of participants to guides (e.g., 10 means 1 guide per 10 participants). This is used on the assignment dashboard to calculate how many guides are needed for each scheduled departure based on current bookings.
- Auto-assign guides based on bookings - When enabled, the system automatically assigns and unassigns guides as booking volume changes. If a tour has 10 participants per guide and 15 people book, it assigns 2 guides. If cancellations drop it back to 8, it releases one guide.
Example: The Alster Lakes & Parks tour has 10 participants per guide with auto-assign enabled:
| Booked Participants | Guides Needed | What happens |
|---|---|---|
| 1-10 | 1 | First guide auto-assigned |
| 11-20 | 2 | Second guide auto-assigned |
| Drops to 8 | 1 | Second guide auto-unassigned |
TIP
Auto-assignment saves significant time on busy days. Guides receive an email notification when assigned to or removed from a tour. You can always manually override assignments on the availability calendar.
Default vehicle type
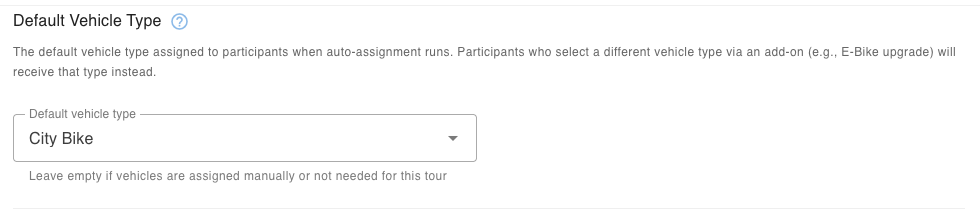
The Default Vehicle Type section lets you specify which type of vehicle (e.g., City Bike, Touring Bike) participants receive by default when vehicles are auto-assigned to the tour.
- Default vehicle type - Select a vehicle type from your fleet. This is the type that will be assigned to all participants unless overridden by an add-on. Leave empty if you assign vehicles manually or the tour does not require vehicles.
How auto-assignment uses this
When vehicle auto-assignment runs before a tour (configured in Vehicle Assignment Settings), it assigns vehicles in this order:
- Add-on selection first - If a participant selected a vehicle-type add-on during booking (e.g., "E-Bike Upgrade" or "Child Bike"), they receive that specific vehicle type.
- Tour default - All other participants receive the tour's default vehicle type.
- Fallback - If no default is set, the system assigns the first available vehicle type.
Using add-ons for vehicle type upgrades
The add-on system is how participants get a different vehicle type than the default. Create an add-on linked to a vehicle type and customers can select it during booking.
Example: The Speicherstadt Heritage Tour has "City Bike" as its default vehicle type. Two add-ons offer alternatives:
| Add-on | Vehicle Type | Price | Use case |
|---|---|---|---|
| E-Bike Upgrade | E-Bike | €15.00 | Adults who prefer electric assist |
| Child Bike | Kids Bike | €0.00 | Children who need a smaller frame |
When auto-assignment runs, a family of four who booked 2 adults (1 with E-Bike Upgrade) and 2 children (both with Child Bike) would receive: 1 City Bike, 1 E-Bike, and 2 Kids Bikes.
TIP
Setting a default vehicle type is recommended for any tour that uses vehicle auto-assignment. Without it, the system falls back to assigning whatever vehicle type is available first, which may not be what you want.
Minimum participants
The Default Min. Participants field sets the minimum number of participants a tour needs to be considered viable. This is optional - if left empty, no minimum threshold is applied.
- How it works - When set on a tour, all schedules for that tour inherit this threshold. You can override the value on individual schedules if needed.
- Dashboard alerts - An hourly background check scans upcoming schedules within a configurable lookahead window (default 24 hours). If a schedule's bookings are below its minimum threshold, a warning alert appears on your dashboard. You can configure the lookahead window in Booking Policies settings under "Minimum Participants Alert" - for example, multi-day tour operators might want 72 hours, while city bike tours might only need 4 hours.
- Calendar indicators - The availability calendar and schedule list always show an amber "Low Pax" indicator on any schedule below its minimum, regardless of the lookahead window. This gives you a visual overview of all under-filled departures, not just the urgent ones.
- Low Pax filter - The availability calendar includes a "Low Pax" filter chip that lets you quickly show only schedules below their minimum threshold.
When a schedule is flagged as below minimum, you can decide what to do: wait for more bookings, boost marketing, consolidate participants into another departure, or cancel the schedule.
TIP
This setting is advisory only - it does not block bookings or auto-cancel schedules. It simply gives you visibility into under-filled departures so you can take action before it's too late.
Time-based pricing
The Time-Based Pricing section lets you configure automatic pricing adjustments based on when a booking is made. Each adjustment can be toggled on or off independently.
Last-minute premium
Charge a premium for bookings made close to the departure time. This helps maximize revenue on popular tours when demand is high.
- Booking window - How close to the departure the premium applies (e.g., 24 hours).
- Premium percentage - The price increase (e.g., 20%).
Example: A tour priced at €100 with a 24-hour window and 20% premium costs €120 if booked less than 24 hours before departure.
Early-bird discount
Reward customers who book well in advance. This encourages forward planning and helps you forecast demand.
- Advance booking window - How far ahead the customer needs to book (e.g., 30 days).
- Discount percentage - The price reduction (e.g., 10%).
Example: A tour priced at €100 with a 30-day window and 10% discount costs €90 if booked 30+ days ahead.
Weekend premium
Automatically increase prices on specific days of the week when demand is typically higher.
- Weekend days - Which days are considered "weekend" (e.g., Saturday and Sunday).
- Weekend premium - The price increase (e.g., 15%).
Example: A tour priced at €100 with a 15% weekend premium costs €115 on Saturday and Sunday departures.
INFO
Time-based pricing adjustments are applied in addition to seasonal rates and before group discounts. See the pricing overview for the full calculation order.
Difficulty levels
Difficulty levels help customers choose tours that match their fitness and experience:
- Easy - Flat terrain, leisurely pace, suitable for all ages and fitness levels.
- Moderate - Some hills or longer distance, basic cycling fitness recommended.
- Hard - Challenging terrain or distance, experienced cyclists recommended.
Tour actions
Each tour in the list has action buttons:
- Tour Options (ticket icon) - Manage pricing variants like private tours or VIP upgrades.
- View Schedules (calendar icon) - Open the schedule management page for this tour.
- Edit (pencil icon) - Update tour details in a dialog.
- Delete (trash icon) - Remove a tour permanently. Only possible if there are no associated bookings.
Click anywhere on the tour row to open the edit dialog.
Tour options
Tour options let you create pricing variants of a tour - different group sizes or experience tiers, each with their own pricing structure. Common uses include:
- Private tours - A small-group or exclusive option with premium per-group pricing (e.g., "Private Tour" for 1-6 people at a flat €250).
- VIP upgrades - A premium version of the tour with a higher per-person price that includes extras like a longer route or a special stop.
- Group size tiers - Different pricing for small groups vs large groups using tiered pricing (e.g., 1-4 people at €50/person, 5-10 at €40/person).
Each option defines a participant range (min/max group size) and a pricing mode:
| Pricing Mode | How it works | Best for |
|---|---|---|
| Per Person | Price multiplied by participant count | Standard group tours |
| Per Group | Flat price regardless of group size | Private tours, fixed-rate experiences |
| Tiered | Different prices based on group size ranges | Volume-based discounts per option |
When a schedule uses a tour option, the option's pricing overrides the tour's price-type pricing for that departure.
To manage options, open a tour and click the Tour Options action (ticket icon).

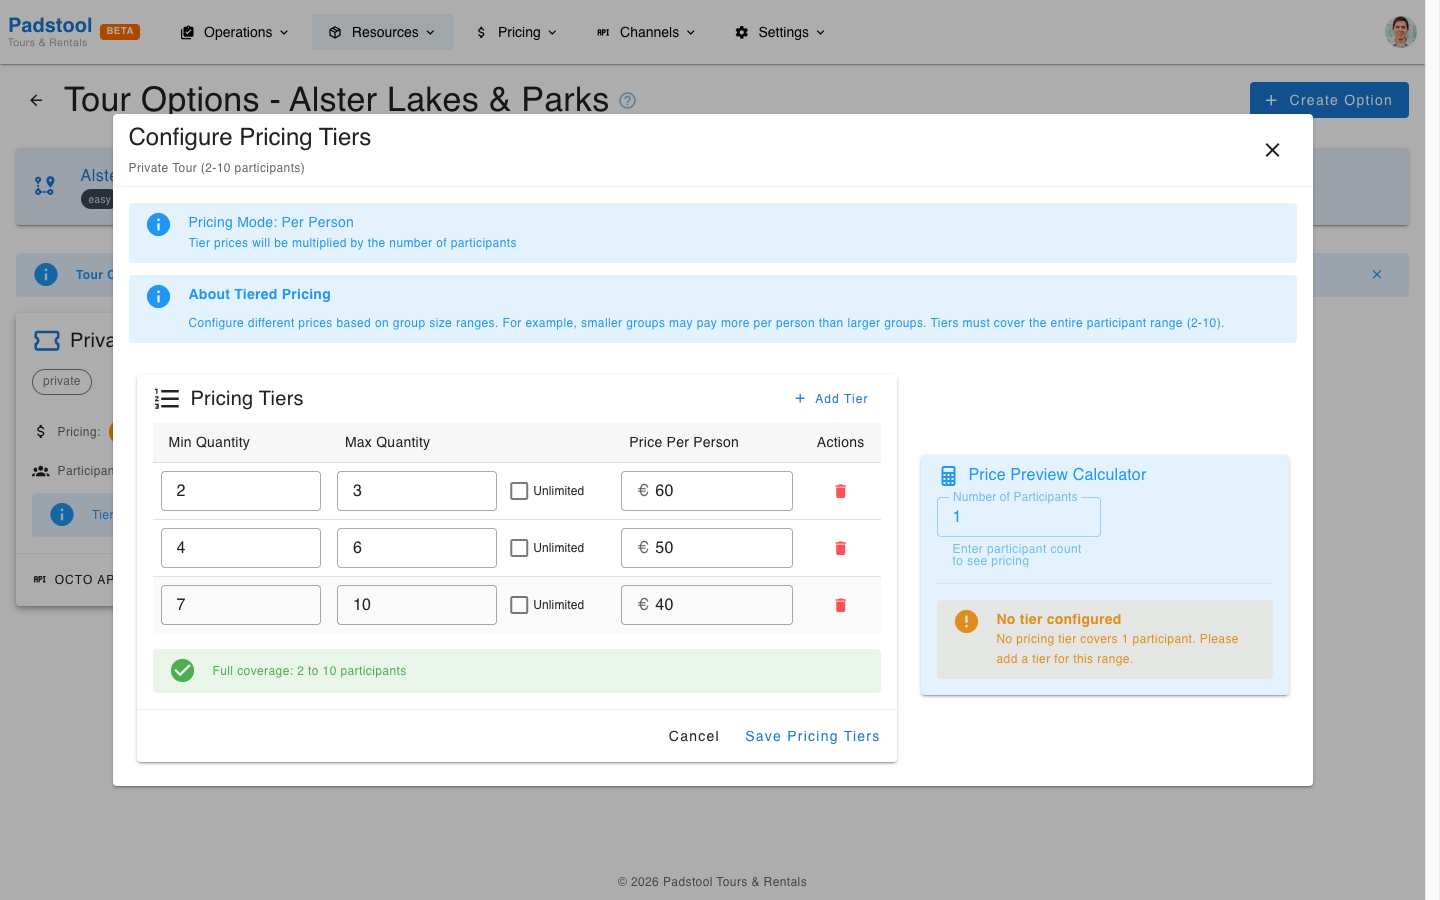
Tiered pricing example
Here is an example of a "Private Tour" option for the Alster Lakes & Parks tour using tiered pricing. Smaller groups pay more per person, while larger groups get a volume discount:
| Group Size | Price Per Person |
|---|---|
| 2-3 people | €60.00 |
| 4-6 people | €50.00 |
| 7-10 people | €40.00 |
Click Configure Pricing on a tiered option to set up the tiers. The system validates that tiers cover the full participant range without gaps or overlaps.
INFO
Tour options are for pricing variants only. For different departure times, use separate schedules. For different languages, set the language on each schedule - this is used for guide assignment.
OCTO Mapping (OTA channels)
If you distribute a tour through OTA platforms via OTA Connections, each tour option can be exposed individually to the OCTO API. Open the OCTO Mapping action on a tour option to:
- Create a mapping - Links the tour option to the tour's OCTO product configuration so OTAs can quote and book it. The tour must already have an OCTO product configuration (set up under OTA Connections) before you can map options.
- Set the cancellation cutoff - Hours before the tour start time at which OTA cancellations stop being eligible for a full refund. After the cutoff, the OTA is told the cancellation is not eligible.
- Delete the mapping - Removes the option from the OCTO API. Existing bookings are unaffected, but the option won't be quotable on OTAs anymore.
OTA cutoffs are independent of Booking Policies
The cutoff configured here only affects OTA bookings for this specific tour option. Direct bookings continue to use the tenant-wide Booking Policies. This split lets you offer stricter or more lenient terms per OTA product without changing your direct-booking policy.
View Schedules
Each tour needs scheduled departures before customers can book it. Click the calendar icon on a tour row to open the schedule management page for that tour. Click Add Schedule to create a new schedule. Use the Repeat this schedule option in the dialog for recurring schedules across a date range.
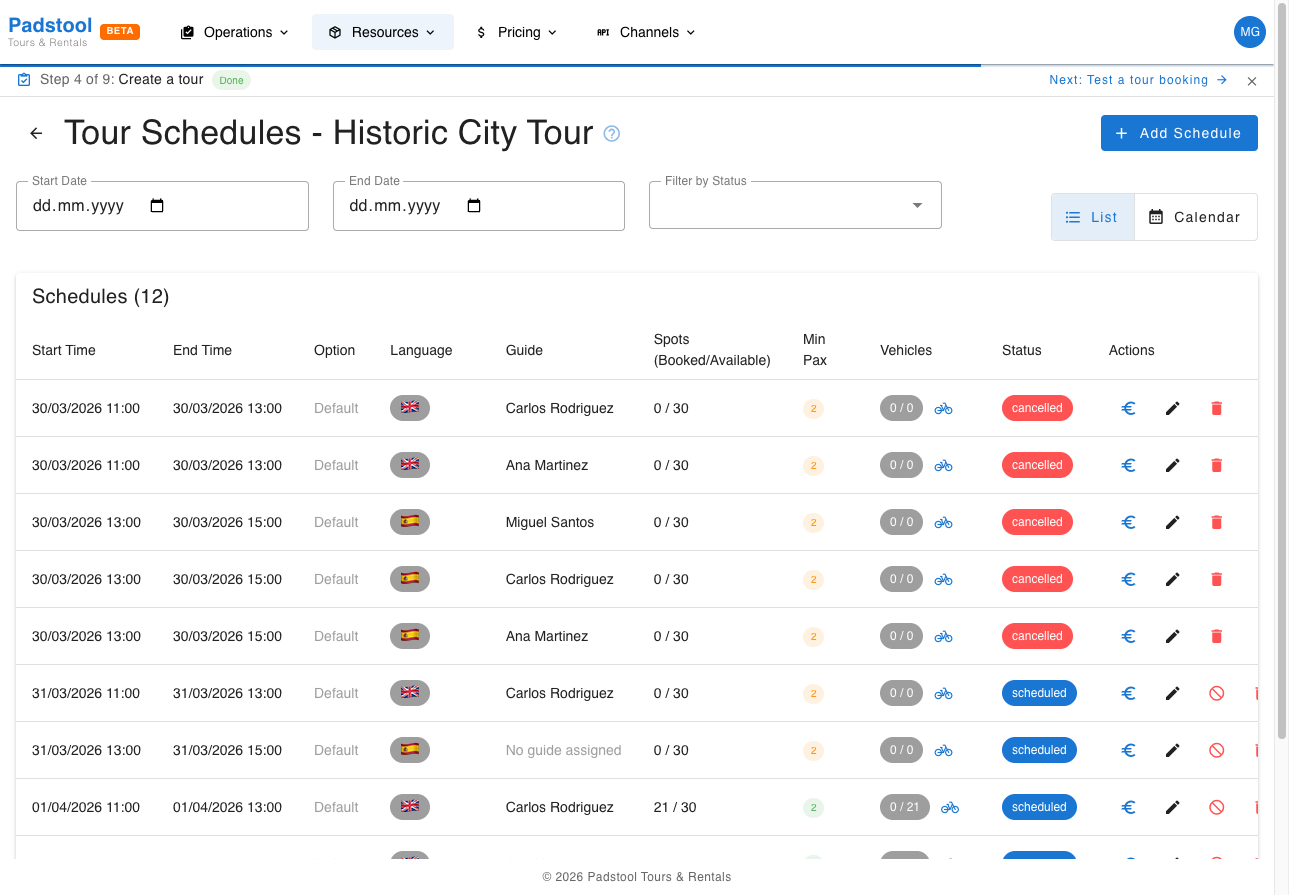
Schedules can also be created and managed directly from the Availability calendar, which shows all tours in a single calendar view. The Availability page is typically the faster way to work with schedules day-to-day, while the tour-specific view is useful for managing a single tour's full schedule history.
See Availability - Creating schedules for full details on creating schedules, recurring patterns, guide assignment, and vehicle allocation. The list view's edit and delete icons open the same scope-aware dialogs documented in Editing schedules and Deleting schedules - useful when you want to change the time of a whole series or wipe an accidentally bulk-created batch.
Managing tours
- Edit - Click on any tour in the list to update its details.
- Deactivate - Toggle a tour to inactive to remove it from the booking widget without deleting it. Existing bookings are not affected.
- Delete - Remove a tour permanently. Only possible if there are no associated bookings.
Tips
- Write compelling descriptions - customers see these in the booking widget and they influence booking decisions.
- Set accurate durations so tour scheduling works correctly and guides know what to expect.
- Use tour options for pricing variants (private tours, VIP upgrades) rather than duplicating the tour. Different departure times and languages are handled through schedules.
- Start tours as inactive while you finalize pricing and descriptions, then activate when ready.
- Review tour capacity based on your guide-to-participant ratio and the practical limits of each route.
TIP
After creating a tour, you need to schedule it on specific dates and assign guides before customers can book it.